Smartphone Real Estate Photography: How to Capture Pro-Level Shots (With a Little Help from Editing)
In 2026, the cameras in our pockets are more powerful than ever. With advanced sensors and computational photography, your iPhone or Samsung is technically capable of capturing stunning property photos. However, there is a massive difference between a “snapshot” and a “listing-ready photograph.”
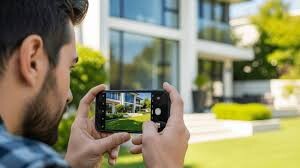
If you are a realtor on the move or a homeowner looking to save on a professional shoot, you can achieve incredible results using just your smartphone—provided you know the right techniques and, more importantly, how to leverage Real Estate Photo Editing.
Here is your ultimate guide to mastering smartphone real estate photography.
1. Preparation: The “Physical” Edit
Before you even open your camera app, the most important “edit” happens in the room.
-
Declutter mercilessly: Clear off kitchen counters, remove fridge magnets, and hide bathroom toiletries.
-
Lighting is everything: Open all curtains and blinds. Turn on every light in the house—even the small bedside lamps. This creates a warm, lived-in glow.
-
Clean the lens: This sounds simple, but a thumbprint smudge on your lens is the #1 cause of “hazy” or “blurry” real estate photos.
2. Shooting Techniques for the Modern Realtor
Use the Ultra-Wide Lens (Judiciously)
Most modern smartphones have a 0.5x or Ultra-Wide lens. This is your best friend for small bathrooms or tight hallways.
-
Pro Tip: Don’t go too wide. If the edges of the photo look like a “fish-eye” lens, it looks distorted and deceptive. A slight wide-angle is enough to show the flow of the room.
The “Chest Level” Rule
Most amateurs take photos from eye level. This makes the floor look like it’s disappearing and the ceiling look oppressive.
-
The Secret: Hold your phone at chest or waist level. This keeps the furniture and the floor in a natural perspective, making the room feel more spacious and balanced.
Use AE/AF Lock
Tap and hold on the screen to lock the focus and exposure. If the window is too bright, slide the “sun” icon down slightly to ensure the interior details aren’t lost in a white glare.
3. Why Even the Best Smartphone Shots Need a Professional Editor
You might take a great photo, but “raw” smartphone images often struggle with two major issues: Color Accuracy and Dynamic Range. This is where a professional Real Estate Editor becomes your secret weapon.
The “Blue Tint” Problem
Smartphones often struggle with “Mixed Lighting.” If you have natural light from a window and yellow light from a lamp, your walls might look half-blue and half-orange.
-
The Fix: An editor performs Color Correction, ensuring that “White” actually looks white, regardless of the light source.
The “Blown Out” Window
Even with HDR mode, smartphones often fail to capture the view outside the window while keeping the indoor lounge bright.
-
The Fix: By sending your photos to an editor, they can use Window Pull techniques to manually mask in the garden or city view, making the home feel premium.
Vertical Alignment
It is very hard to hold a phone perfectly straight. Tilted walls make a house look “cheap.”
-
The Fix: Editors use professional software to fix the Vertical Perspective, ensuring every wall is perfectly straight.
4. 2026 Smartphone Photography Checklist
| Task | Why it Matters |
| Grid Lines ON | Helps you keep the horizon and walls straight. |
| HDR Mode ON | Captures more detail in shadows and highlights. |
| No Flash | Phone flash creates harsh shadows and ugly reflections. |
| Steady Hands | Use a tripod or lean against a wall for sharpness. |
5. From “Meh” to “Sold”: The Post-Processing Magic
Imagine you’ve taken a decent photo of a living room, but the sky outside is grey and there’s a stray power cord on the floor.
-
Step 1: You upload the photo to your editor.
-
Step 2: The editor swaps the grey sky for a sunny blue one.
-
Step 3: They digitally remove the power cord and the “For Sale” sign reflected in the window.
-
Step 4: They sharpen the textures and brighten the corners.
The result? A photo that looks like it was taken by a pro with a $3,000 DSLR.
Conclusion: Your Phone is Just the Starting Point
Smartphone photography has democratized real estate marketing, but the “pro look” still requires a human touch. By combining your “on-the-ground” eye with a professional Real Estate Editor’s technical skill, you can produce world-class listings at a fraction of the cost.